Showing posts with label Kids Activities. Show all posts

10/8/13

Autumn Splendor and Some Family Time

We like to walk the Aspen Loop Trail that is right by our house each autumn when the colors have changed.


It's just a short little walk, hardly a hike, but it always takes us forever because we have to take hundreds of pictures. 


I actually only used my iPhone this time, because I had just added some great new camera apps that I wanted to try out. 


Adventure Man used the Nikon and the Olympus, which is the one I usually use. I'll share the new apps later this week.


We found lots of ladybuds and had to catch them and chase them through the wild rose bushes that were covered in red rose hips and thorns. 


The kids loved it. 


We got to see everyone having fun in the fresh air and enjoy the warmth of the day before winter is a permanent fixture in our little Montana valley. 


We got to have some together time without too much griping or arguing. 


We love to take in the view and climb the rocks at the end of the loop. 


One of my favorite blogs is written by Emily at The Anderson Crew Blog. She is the creator of Embrace The Camera and is sharing all week long. As someone who would rather take pictures than be taken in pictures, I have tried to make sure I was embracing the camera more often. So I'm sharing these shots with you today.  Her theme for today is memories. I hope my kids will have happy memories of our seasonal adventures!


Head over to Emily's place to find out more. 

4/23/13

T is for Toads

I have a soft spot for amphibians. I love catching frogs and toads. I'm sure this dates back to my childhood. No really! If you don't know, read THIS!

And see, I have taught my children well. 


But at least these are alive!

4/13/13

L is for Ladybug

What is it about a ladybug that brings happy summer childhood memories? 
This is a bug that begs to be caught. 


And my kids are expert bug catchers.

4/1/13

A is for Art...

…kids art.
I love this little corner of my kitchen. 
It's an ever changing gallery of my dear ones imagination.


Actually, you can tell what grades my kids are in by the art they bring home.


I love it!

12/24/12

Our Elf on the Shelf

We have one of those elves. The ones who come to life and tell on my kids. He freaks me out. But, hey, if he makes my kids act better during the month of December, than God Bless him. 

He loves to make the kiddos laugh each morning when they find him. 
His name is Mr. Candy-Cane. This is our 3rd year hosting him. 

Here is what he has done. And he gets most of his, no, ALL of his ideas from cleaver places like Pinterest and Instagram, although he isn't nearly as naughty as some of those other elves. 

(Do be advised that looking up #elfontheshelf on Instagram, can bring up some very Naughty Elves indeed!)

C.C. arrived the day after Thanksgiving with a note stating that it was TIME!

Blending in with the locals.

Uh, this was MAMA's Stash!!! 

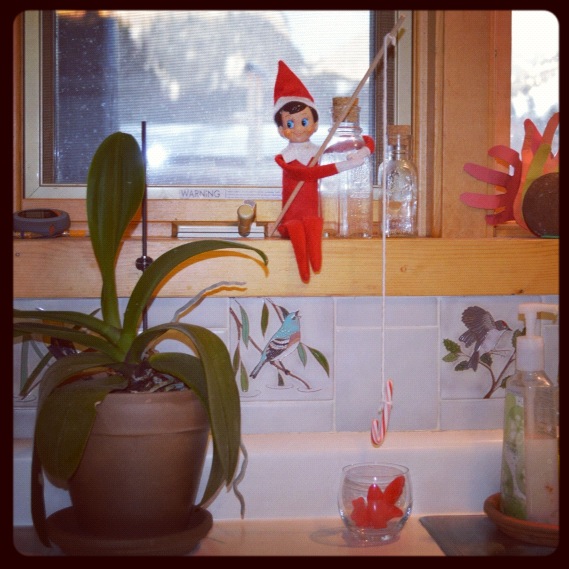
Going fishing. 

Hanging out in the bathroom. 
No one would use that bathroom that day! See! 
I'm not the only one who thinks he is creepy! 

Toasting Marshmallows.

Playing cards.

Reading stories.

Making snow angels… in the sugar.

Bubble bathes.

Camping under the stars.

But now it's time to bid this little scamp good-bye for another year. 
So long C.C., 
So long…. 
And Merry Christmas!!!

12/13/12

The Gingerbread Project

Apparently our school makes gingerbread houses in the fourth grade. I received a paper with a recipe and instructions as well as a time line of when things should be brought to school and when they should be baked and cut and dried.

I never new that gingerbread had to dry for at least 2 weeks before you could make the house! Where on earth am I going to keep all this gingerbread!? And of course I doubled the recipe so I would have a house to make with the little ones while we are at the school, and maybe one to make with Grandma while she's here…. That's a lot of gingerbread!

Here is the recipe that school sent home.

I doubled the recipe and ran out of molasses!
Adventure Man saved the day by bringing me some
from the Lodge Kitchen
The Little Town School's Gingerbread

1/3 cup shortening
1 cup brown sugar (packed)
1 1/2 cup dark molasses
2/3 cup cold water
7 cups all-purpose flour
2 tsp. soda
1 tsp. salt
1 tsp. allspice
1 tsp. ginger
1 tsp. cloves
1 tsp. cinnamon

Mix molasses, shortening and sugar thoroughly. Stir in water. Measure flour by dipping method or by sifting. Blend all ingredients, stir in. Chill. Divide dough in half.

(Mama's Notes: Measure the flour in a separate bowl and mix all the dry ingredients. Mix the dry ingredients a little at a time until it is too hard to mix with a mixer. Then turn it out to kneed in. Divide dough before chilling and wrap in plastic wrap. It's also helpful if you flatten each section before chilling so it's ready to roll once it's chilled.)

Heat oven to 350 F. Roll dough 1/4 inch think on 2 lightly greased cookie sheets. (15 1/2" x 12" is a good size for the cookie sheet to get the most use of the gingerbread.

Lulu, Bean, and Bear. Making their house at home.
It turned out scrumptious looking! 
Bake 10-12 minutes, or until no imprint remains when touched lightly. Cut the shapes while gingerbread is still warm. Cut as many rectangles and triangles as possible. Carefully remove from pan and place on a cooling rack. Keep as flat as possible while cooling to prevent pieces from curling. Gingerbread should get very hard.

1 batch should make 1 1/2 to 2 houses depending on sized of cookie sheets used.

(Mama's Notes: The templates that the school uses are for an A-frame house. They wanted just two triangles and two rectangles for each kid. That's fine, but for the house we did at home, I made four rectangles, the same length as the roof. They were only two inches tall, but it gave the feel of a regular house.)

They asked us to cut the pieces 6x6x7" for the triangle and 6x7" for the rectangles roof.

The Little Town School's Icing

1 lb. confectioners sugar
3 egg whites
3/4 tsp. cream of tarter

Beat with a mixer until smooth

Bunny and I were there too.
But I never got a picture of Grandma!
What was I thinking!

~~~~~

12/12/12

Dollhouse Diaries II

Today on the Dollhouse Diaries, Mom is getting the chores done. 


Dad's getting ready to help clean up by staring with his own hands.


Little Lucy is sweeping up the dining room while Baby Jimmy is trying to feed a carrot to the kitten.


Granny is looks like she's got a project going.


Here is the yard my daughter made for the family.
Complete with a toilet paper roll tree and a veggie patch. 


And last, Granddad seems to be indisposed! 


He doesn't seem to notice the camera!


The Dollhouse Diaries is brought to you by my daughter, Lulu, who loves to set up the dolls and even took all these pictures as well. 


11/1/12

Owl Costume

I was going to say that this was a tutorial in the title of this post. But then I thought about it. This isn't as much of a tutorial as it is me just saying, "look what I did!"


My daughter loves owls and has an owl hat. This was the inspiration to her costume. We bought the hat on clearance last spring. I got the idea to make this from something I saw on Pinterest.


What I Did:

For the wings:

I bought about 2 yards of felt from a roll (I say "about" because I can't remember if I got 2 or 3 yards as I was also making wings for Hawk-girl)
Quilt scraps (with the same color theme)
Pinking shears
Hot glue gun
Ribbon (Enough to make ties at wrists and at neck or shoulders).

I measured my daughter from finger tip to finger tip, with her arms outstretched. Then I folded the large piece of felt in half and cut a wing shape from the fold.


I cut the "feathers" by just eyeballing them. This was the most time consuming part. I didn't even iron them! If it was a little more wrinkled, I just used more glue.

I started at the tip of the wings and worked in from the bottom. I used the hot glue and it worked so well, the only problem was after doing two sets of wings in a row, my fingers where raw!


Lastly, I glued the ribbon on at the tips of the wings and at the neck. I glued a strip of felt over the ribbon just to be sure it held. If you decide to sew this, do it first! because you wont be able to sew through the glue. I made the ribbon long enough at the neck to take the ribbon over her shoulders, and around to her back to tie it. This kept it from pulling on her neck. It made it like a backpack strap instead. It also made it long enough to go over a coat if needed. Although, none of my kids wanted to wear a coat over their costume and it was only like 40 degrees which to them, is warm enough! Considering it was in the 20s last week, I guess I can see their point. Kind of. I wore my big dawn coat. Cause I'm always cold. 


For the Tutu Skirt:

I needed 6 yards of tulle netting.
An elastic band long enough to fit waist.

I sewed the band first,  I only had white and was wishing I had picked up some black, but I was determined to use what I had on hand as much as I could. So we went with white.  I cut the tulle into strips about 5 inches wide and just tied them in a knot around the band. If you look at the next picture you can see the band and the knots. It turned out really cute and I'm thinking the girls would have fun with a pink one, or a blue one. It would also work for a witches skirt too. So many possibilities!


She loved it and so do I!

10/22/12

Reflections ~ One Year Ago

I always like to look back at the photos on the computer and see what I took pictures of a year ago on that dates. I felt it was time to share another post about it. 


When you have small children it's always amazing to see the difference.  


Remember when all the toys just fit in one basket? 
And she was fascinated by the simple ones. 
She would sit and play. Not toddle and destroy!

 "One Sock" 

And there was the afternoon I asked the older kids to watch the baby, 
only to find that they had put her in the linen closet.


 It made since to them, after all, it is their favorite place to play! 
They were just sharing their hiding place. 

Now it is her favorite place to hide too. 

9/11/12

Bunny in the Garden

Bunny wants to go into the garden. 
She pulls on the gate until I come and unlatch it. 

And she's off! 
She loves it in here and wants to show me everything she finds. 


I go grab a few stems of chard for lunch. (Sshhh! Don't tell the cook!)
This isn't my garden (Even though it's in view of my kitchen window)! 
It's the Ranch's garden. 
The organic veggies they grow here are served to the guests. 
But they have a lot of swiss chard, I love swiss chard!


Bunny comes to get me. 
She wants me to see something.


Is it the onions?


No, not the onions.


Where are we going? 
Oh, is it the squash?


No, not the Squash. 
Is it the rhubarb?


No, not the rhubarb. 
By the way, I have been told to take as much rhubarb as I want! 
It's been taking over this garden for as long as 
the ranch has been planting here! 
~~~~~
What the heck do you make with rhubarb??? 


What was I doing? Oh yeah, Bunny! 
What did you find?


A ladybug! How Fun!


There were a few beds left unplanted this year and I'm thinking I will ask for one next year as a family plot. We were just too busy this year… will next year be better… probably not! Ha!